TD2 punishes the strategies that worked in TD1. Towers that carried players through the original mode hit damage ceilings faster, boss waves arrive earlier and hit harder, and the gold economy demands tighter decisions at every upgrade window. If you’ve walked into TD2 with a TD1 mindset and watched your defenses crumble by wave 7, you’re not alone.
This guide covers the tactical shifts TD2 actually requires: which towers earn their cost, how the gold loop changes between modes, how to prepare for boss waves, and the specific placement errors that sink most runs. These tips apply whether you’re playing solo or in a class session.
What makes Blooket Tower Defense 2 different?
TD2 is a harder, more layered version of the original Tower Defense mode. The core loop – answer questions, earn gold, build towers, stop waves – stays the same, but enemy variety, boss wave frequency, and the tower roster all expand significantly. Players who treat TD2 as a simple re-skin of TD1 consistently underperform.
New towers and expanded mechanics
TD2 introduces tower types not present in the original mode, including towers with specialized roles like area denial, enemy debuffing, and multi-target fire — see the full new Blooket game modes list for other recent additions. Each tower in TD2 has a more distinct function, which means the “buy any tower and upgrade it” approach that works well in TD1 produces weak results in TD2.
Upgrade paths in TD2 also branch further. A tower’s second and third upgrade levels change its behavior more dramatically than in TD1, so the upgrade you commit to early shapes your entire defensive capability for that run. Choosing the wrong upgrade at level 2 is harder to recover from than in the original mode.
How enemy waves changed in TD2
Enemy composition in TD2 shifts more frequently within a single run. Early waves introduce fast-moving enemies sooner than TD1 does. Mid-game waves mix tanky and fast enemies in the same group rather than separating them cleanly. Boss waves appear at defined checkpoints and require targeted counters rather than general-purpose firepower.
The most critical change: TD2 enemies have more distinct behavioral patterns. Some move in tight clusters that reward splash-damage towers. Others split into two routes simultaneously, forcing wider coverage than a single kill zone provides. Recognizing the pattern at the start of each wave – before spending any gold – determines whether your response is proactive or reactive.
Which towers should you pick in TD2?
The best towers in Blooket Tower Defense 2 are the ones that address the wave pattern you’re actually facing, not the ones with the highest listed damage. That said, certain towers carry consistent value across most run configurations.
Early-game tower picks
Your first tower in TD2 should be a damage dealer placed at the first major corner of the path. Unlike TD1 where almost any tower handles the opening waves, fast enemies arrive by wave 2 or 3 in most TD2 configurations, so a tower with reasonable attack speed matters more than raw burst power at the start.
Resist the area or splash tower as your opening buy. It performs poorly against the single-file fast enemies that dominate early TD2 waves and earns its value later when dense clusters start arriving. Buy it second or third, not first.
One focused damage tower with two upgrades handles waves 1 through 4 more reliably than two or three basic towers spread across the path.
Mid-game tower priorities
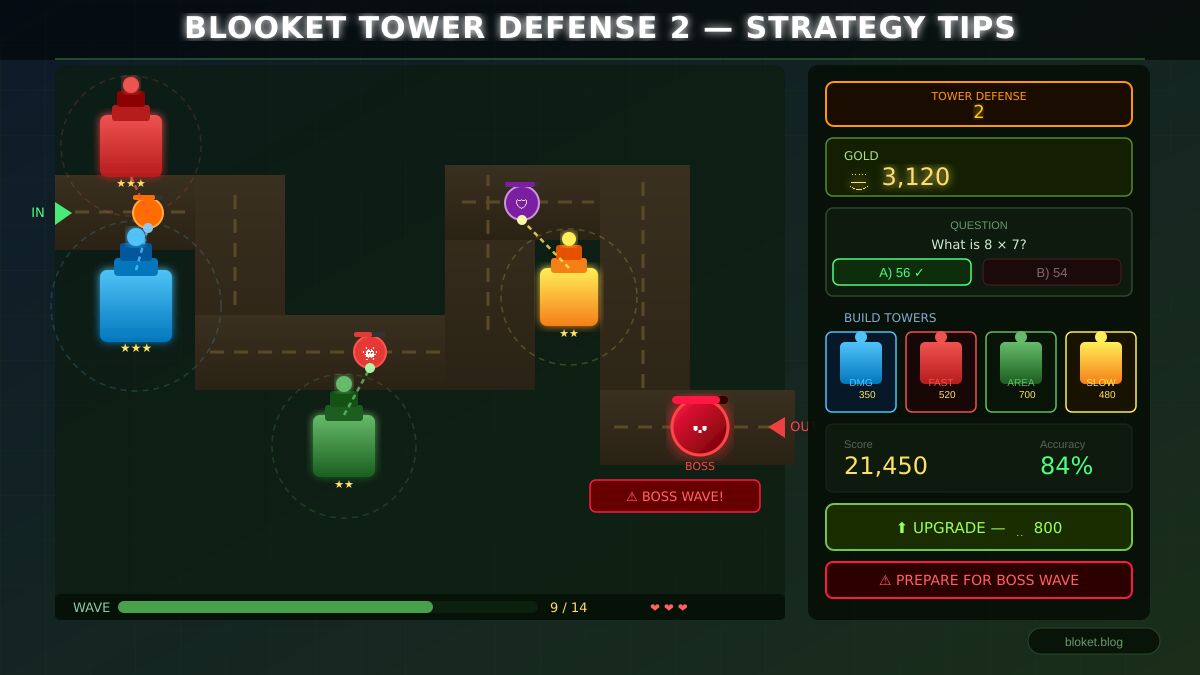
By wave 5, you need three things in place: a maxed or near-maxed primary damage tower, at least one fast-attack tower at an entry corner, and a splash or area tower positioned at the map’s densest bottleneck.
This combination of tower types covers the three enemy categories TD2 consistently throws at you – tanky singles, fast swarms, and tight clusters. Missing any one of the three creates a specific and repeatable leak in the mid-game.
Budget sequence: max your damage tower first, then buy the fast-attack tower at the entry corner, then invest in the splash tower at the bottleneck. Deviating from this order is fine when a specific wave is already exploiting a gap, but this sequence works across most TD2 maps.
Tower synergies that consistently work
Damage tower + slow tower at the same corner: The slow tower reduces enemy movement speed, keeping them inside the damage tower’s range longer. A single slow tower paired with a maxed damage tower at a bend produces higher effective output than two damage towers placed independently.
Fast-attack tower + area tower at a bottleneck: The fast-attack tower shreds clusters of light enemies while the area tower hits every enemy passing through simultaneously. Together they handle mixed-composition waves that would split the attention of a single tower type.
Two overlapping damage towers mid-path: Not flashy, but reliable against the high-health enemies TD2 introduces in waves 8 through 12. Two overlapping towers deal simultaneous damage to the same enemy, cutting high-health units down before they reach the exit.
How does the gold strategy change in TD2?
TD2’s gold economy is tighter than TD1’s, primarily because more towers are genuinely useful, which creates more temptation to over-spend early. The answer-gold loop works identically, but how you allocate what comes in requires more discipline.
TD2 economy differences from TD1
In TD1, the correct answer to “upgrade or expand?” is almost always “upgrade.” In TD2, that answer is still usually correct, but the exception cases come up more often. TD2 has tower types – specifically support towers like slow and area – that add more value as second or third purchases than they do as later additions to an already-complete setup.
This means you expand slightly earlier in TD2 than in TD1, but still avoid the trap of buying widely without depth. Concretely: after your anchor damage tower reaches two upgrades, buy your support tower before returning to finish the anchor. Then max the anchor. That ordering handles the enemy mix better than waiting to complete the anchor before any expansion.
When to save vs spend in TD2
Two moments to bank gold aggressively: before boss waves and at the wave 5 threshold. Boss waves in TD2 arrive at predictable checkpoints, and entering one with a fully upgraded setup versus a partially upgraded one is the difference between a clean clear and a leaked wave. Identify when your next boss wave is approaching and save for at least two full waves before it hits.
The wave 5 threshold matters because TD2’s enemy health scaling jumps noticeably there. Players who spend everything across waves 1 through 4 arrive at wave 5 with no reserve to respond to the new threat level.
The upgrade timing window
TD2 gives brief windows between wave phases where upgrade decisions feel less urgent. These are traps. The best time to upgrade is the moment you can afford it, including mid-wave. A damage tower sitting at upgrade level 1 while enemies are actively walking through it is leaving its ceiling unused.
Check your gold balance at the wave start, not just between waves. If you can afford an upgrade and the wave hasn’t fully cleared yet, buy it immediately.
How do you beat boss waves in TD2?
Boss waves are the mode’s defining challenge and the point where unprepared setups consistently collapse. A boss blook carries significantly more health than standard enemies and often moves at variable speed, making exposure time inside a kill zone harder to predict.
Reading boss wave signals
TD2 signals an incoming boss wave through an on-screen indicator before the wave launches. When you see it, stop buying and check three things: whether your damage tower is maxed, whether a slow tower is placed at the main chokepoint, and whether any coverage gaps exist along the path.
Do not buy a new tower just before a boss wave unless it fills a specific, identifiable gap. A new basic tower will not change the outcome of a boss encounter. A maxed damage tower will.
Anti-boss tower setup
The most reliable anti-boss configuration is a damage tower and a slow tower at the same chokepoint, with a second damage tower positioned further down the path. The slow tower keeps the boss in the first damage tower’s range longer. The second damage tower finishes off any health that remains.
Splash and area towers are largely ineffective against boss blooks because bosses typically arrive as single enemies, not clusters. Redirect your area tower’s fire to the normal enemies that accompany the boss rather than targeting the boss itself.
TD2 tower matchups vs enemy type
| Enemy type | Best counter | Placement | What to avoid |
| Fast/light enemies | Fast-attack tower | Entry corner | High-damage, slow-rate towers |
| Tanky/slow enemies | High-damage tower | Mid-path kill zone | Fast-attack (low per-hit damage) |
| Dense clusters | Area/splash tower | Bottleneck or bend | Single-target towers only |
| Boss blooks | Damage + slow combo | Same chokepoint | Area towers as primary counter |
| Mixed waves | Fast-attack + area overlap | Stacked at main bend | Any single tower type alone |
Use this table when a new wave’s enemy composition is visible before the wave launches. Matching tower type to enemy category is more valuable than buying more of the same tower.
Common TD2 mistakes and how to fix them
Most losses in Blooket Tower Defense 2 trace back to four patterns. Recognizing them cuts down the trial-and-error time significantly.
Applying TD1 strategies directly
The instinct to max one tower and ignore support purchases works in TD1 and fails in TD2. Fast enemies arrive sooner and mixed-composition waves appear earlier, which means a single maxed damage tower covers a smaller percentage of total threats than in the original mode.
The fix: build the support combination (damage, fast-attack, area/slow) by wave 6. In TD1 you can delay that structure until wave 8 or 9 without consequences. In TD2, skipping it costs you the mid-game.
Under-preparing for boss waves
Spending freely in the two waves before a boss checkpoint is the most common reason players lose boss rounds. TD2 boss blooks carry enough health to walk through a kill zone that handles normal enemies comfortably.
Practical rule: treat every second wave as a potential banking round. Arriving at a boss wave with two upgrade costs in reserve is the correct standard preparation.
Wrong tower placement on TD2 maps
TD2 maps tend to have tighter bends and longer straight sections than TD1. Placing towers along the long straights looks efficient because enemies travel through them for a long time, but enemies move faster on straights than on bends. A tower at a corner fires more shots per enemy even on a shorter path segment.
Also specific to TD2: maps with split-path sections send enemies down two routes simultaneously. Placing all towers on one side of the split leaves the other lane undefended. At minimum, keep one fast-attack tower covering the secondary lane at all times.
Ignoring answer accuracy during easy waves
Easy waves are the worst time to get sloppy on questions. The gold you earn during low-threat waves is your reserve for boss rounds and mid-game upgrades. Players who coast through easy waves by rushing answers arrive at hard waves short on budget.
The difference between 70% and 90% answer accuracy across a full run is worth two to three full tower upgrades. Every wave, every question, same focus.
FAQs
What is the main difference between Blooket Tower Defense and Tower Defense 2?
TD2 adds more enemy variety, earlier boss waves, and a broader tower roster with more specialized roles. The question-gold-tower core loop is unchanged, but TD2 demands support tower synergies and earlier coverage planning that the original mode largely lets players skip without being punished.
What is the best first tower to buy in Blooket Tower Defense 2?
A mid-range damage tower placed at the first corner of the path. Fast enemies appear earlier in TD2 than in TD1, so attack speed matters from the start. Skip slow and area towers as your opener – they underperform against the single-file fast enemies that lead the early waves.
How many towers do you need to complete TD2?
Four to five towers with full or near-full upgrade paths is a strong finish. The target composition is one primary damage tower, one fast-attack tower, one area or splash tower, and one slow support tower. A fifth damage tower at a secondary bottleneck rounds out a complete setup for the late waves.
Why do boss blooks keep reaching the exit in TD2?
Almost always because the kill zone lacks a slow tower. Boss blooks have high health and can move through a pure damage setup quickly enough to survive. Placing a slow tower at the same position as your best damage tower is the most direct and effective fix.
Does answering questions faster give more of an advantage in TD2 than TD1?
Answer speed affects gold income equally in both modes. What changes in TD2 is the cost of having less gold – because TD2 needs more tower types and more upgrades to handle enemy variety, a smaller income from poor accuracy creates bigger strategic problems. The same answer accuracy that lets you coast in TD1 will leave you under-built in TD2.
Can the same tower strategy work on every TD2 map?
The core approach – damage anchor, fast-attack at entry, area at bottleneck, slow at the main kill zone – applies across all TD2 maps. Placement positions shift based on corner layout and whether paths split. Check for split-path sections before placing your first tower, and keep one tower covering each active lane.
Is Blooket Tower Defense 2 effective for classroom review?
Yes. The question-funds-defense mechanic is the same as TD1, with the added benefit that TD2’s greater difficulty rewards deeper engagement with the question material. Students who answer correctly and consistently build stronger defenses, which creates a direct in-game incentive for academic focus. It works best as a review mode after students have studied the content — TD2 also features in our best modes for large classes guide.
Conclusion
Blooket Tower Defense 2 asks for the same fundamentals as TD1 – accurate answers, disciplined gold, smart placement – but applies them in a faster, more varied environment where mistakes compound quicker. The players who adapt their TD1 instincts rather than abandon them entirely tend to advance the furthest.
Start your next run with a clear order: damage tower at the first corner, two upgrades before any expansion, fast-attack at the entry, area at the bottleneck, and banked gold before every boss checkpoint. That structure won’t guarantee a perfect run. It will guarantee you’re never losing for a reason you can’t explain or fix — see our complete Blooket game modes ranked list for more strategies.
Build a smarter future—our in-depth guides give you the tools and confidence to move forward.