Most players lose Tower Defense the same way: they scatter gold across random towers in the first two waves, fall behind on upgrades, and watch later waves walk straight through. The fix is simpler than it looks, and it starts before you place a single tower.
This guide covers how Blooket Tower Defense works mechanically, the gold decisions that determine whether you survive wave 12, and the placement principles that hold up as enemy difficulty scales. Whether you’re a student chasing a top score or a teacher running Tower Defense as a class review activity, the same core strategy applies — for the sequel, see our Tower Defense 2 tips.
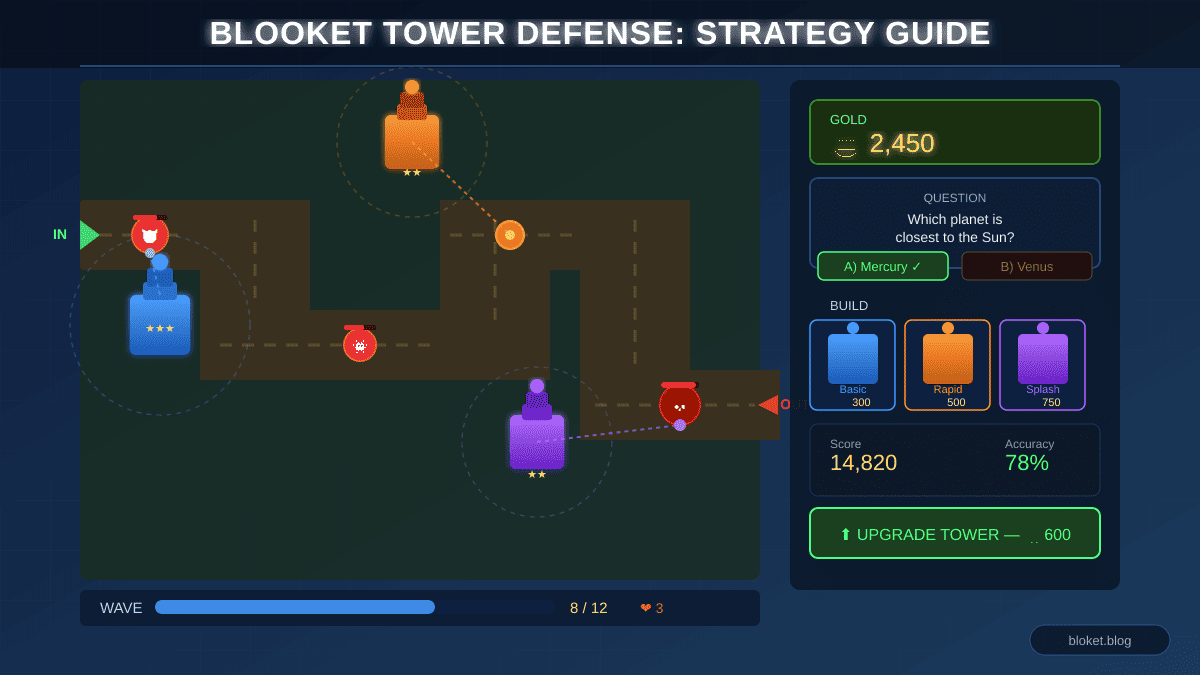
What is Blooket Tower Defense and how does it work?
Blooket Tower Defense tasks players with answering trivia questions to earn gold, then spending that gold on towers to stop waves of enemy blooks from crossing the map. Answer correctly and fast, and you build a steady economy. Fall behind on answers, and your towers can’t keep pace with escalating waves.
The mode sits at the intersection of a quiz game and a light strategy game (for a more PvP-focused strategy mode, see our Crypto Hack guide). Your academic performance directly funds your defense – a mechanic that makes Tower Defense one of the most engaging Blooket modes for both classroom review and competitive play.
The question-gold loop
Every correct answer adds gold to your total. The more accurately you answer, the more gold flows in per unit of time. This is the single most important mechanic in the mode, and it’s what many players completely underestimate.
A player who answers 80% of questions correctly will consistently out-build one who answers 50%, even with identical strategy. Wrong answers don’t always subtract gold, but they cost time and opportunity – every missed answer is a missed chance to upgrade a tower before the next wave arrives.
Speed matters too, but accuracy comes first. Racing through questions and getting them wrong is worse than taking an extra second to think.
Tower basics and enemy waves
Towers are placed on open squares beside the enemy path and attack automatically within their range. Different tower types offer different combinations of attack speed, damage output, and range. As waves progress, enemies grow faster, more numerous, and harder to kill – which means a tower that handled wave 3 without trouble will start struggling by wave 9 unless you’ve been upgrading it.
Each wave is a checkpoint. Pass it and you’ve bought time and gold for the next setup phase. Fail it – letting enemies reach the exit – and you lose lives or score, depending on how the session is configured.
How do you build the best tower setup?
The strongest Tower Defense setups share three traits: complete path coverage, concentrated firepower at chokepoints, and upgrade depth over tower spread. Most setups that collapse in the mid-game violate at least one of these.
Choosing your first towers
Spend your opening gold on one or two towers placed at the first significant curve or corner on the map. Enemies slow through turns, which means they spend more time in range of towers near bends. One well-placed tower at a corner will outperform three towers placed along a straight stretch, because each enemy absorbs more shots before clearing the range.
Avoid the very start of the path. Anything that slips past a tower at the entry still has the full map left to travel. Towers placed two-thirds into the path also give you less reaction time if something breaks through early defenses.
The best opening placement sits in the middle third of the map at a curve. It covers the most dangerous early stretch and leaves room to add supporting towers on either side as your gold grows.
Upgrading vs expanding
This is the decision most players get wrong. Buying a new tower feels productive because you can see a new piece on the grid. A single fully upgraded tower, though, consistently outperforms two half-upgraded towers placed separately for the same total gold cost.
Concentrate on maxing your anchor tower before expanding. The only time to break this rule is when the path branches or a new wave pattern requires coverage in a location your existing towers don’t reach. In that case, place a bare minimum tower to close the gap, then return to upgrading your primary tower immediately.
Think of expansion as filling holes, not adding volume.
Tower placement principles
Three rules cover the majority of good placement decisions:
Place at curves and corners: Enemies travel through turns more slowly, giving towers more time per enemy. A corner with two towers creates an early kill zone that handles most introductory waves without upgrades.
Overlap tower ranges deliberately: Two towers with overlapping coverage fire on the same enemy simultaneously. Three overlapping towers on one stretch of path can clear entire groups before they reach the next bend.
Plan ahead on the grid: Leave room for expansion. Filling every available square in wave 3 leaves no space to add towers in wave 10 when your economy is strongest and your defenses need reinforcement most.
Gold management: the skill most players overlook
Gold management is the hidden mechanic separating players who clear every wave from those who barely survive the middle rounds. Most players spend reactively – they see a wave coming, panic-buy a tower, and arrive at the next wave broke and under-upgraded. Disciplined spending flips this entirely.
Early-game gold priorities (waves 1-4)
Treat the first four waves as income rounds. Enemy health and counts are low enough that almost any tower placement survives, which means these waves should function as a gold-building phase, not an aggressive build phase.
Target: enter wave 5 with enough gold to fully upgrade your anchor tower or place two solid secondary towers simultaneously. Players who overspend in waves 1 through 3 consistently hit a wall in waves 5 to 7, when enemy scaling starts to bite and they have no budget to respond.
One strong tower with two upgrades beats four basic towers in the early waves. Test this once, and you’ll never over-buy at the start again.
Mid-game spending decisions (waves 5-9)
The mid-game is where Tower Defense actually tests your setup. Enemy speed and health scale sharply in this window, and defenses that coasted in early waves start showing gaps. Your mid-game budget should go almost entirely to upgrading existing towers, not buying new ones.
If your anchor tower is maxed and you have surplus gold, then add a secondary tower at the next key corner. But “I have gold” alone is not a reason to place a new tower. Ask: would a tower upgrade deliver more per coin than a new placement? Almost always, yes.
The mid-game is also when faster enemies begin appearing more frequently. If quick-moving blooks are cutting through your damage towers, a fast-attack tower added to your kill zone may help more than another upgrade on your existing damage dealer.
Late-game optimization (wave 10 onward)
From wave 10 forward, enemy health values can overwhelm under-maintained defenses quickly. By this stage, aim for at least two fully upgraded towers and one support or area-effect tower covering the map’s longest straight stretch.
Late-game gold serves two purposes: filling coverage gaps along the path and adding support towers that extend the time enemies spend in your kill zone. Towers that slow enemies are especially useful in later waves – they give your damage towers more shots per enemy, turning close calls into clean clears.
If you hit a wave with surplus gold and nothing obvious to buy, look for stretches of path where no tower’s range covers the enemies walking through. Even one uncovered section can become the gap that loses a wave.
Advanced wave defense tactics
Once the fundamentals are solid, these tactics push performance from competent to dominant.
Reading enemy patterns
Each wave sends enemies in distinct groups. Paying attention to the composition – fast, low-health enemies versus slow, high-health ones – tells you which investments will pay off most next round.
Fast enemies are handled by high-attack-speed towers. Slow, tanky enemies need sustained damage output from upgraded towers. The most dangerous wave types mix both, which is why having at least one fast-attack tower and one high-damage tower in your setup by the mid-game covers most compositions.
When a wave starts, watch the first group through your kill zone before spending any gold. Seeing whether enemies move quickly or absorb hits slowly tells you more about what to buy next than any general rule.
Handling boss or high-health enemies
Heavy enemies appear in later waves and absorb tower fire long enough to walk through a concentrated kill zone if your damage is too thin at one point. The counter-strategy is depth – towers spread along the full path length so high-health enemies take continuous fire from entry to exit, not only at one chokepoint.
Think of it as a gauntlet rather than a wall. A wall fails when one heavy enemy punches through. A gauntlet means every enemy takes fire from multiple towers across its full journey, and most don’t reach the end.
Building a gauntlet means placing towers near the start of the path as well as in the middle. Early-path towers deal partial damage to heavy enemies that your main kill zone then finishes off.
Prioritizing the question phase under pressure
One tactic that players overlook entirely: when a wave ends and a new question appears, focus on the question before adjusting towers. The temptation is to immediately buy and upgrade while half-watching the quiz, but the question phase is your income window. A correct answer funds half an upgrade. A wrong one, because you weren’t paying full attention, costs exactly that.
In competitive or class settings, treating the question phase as seriously as the wave itself is a real strategic edge – not a minor suggestion.
Tower type comparison
| Tower type | Best use case | Main weakness | Optimal placement |
| High damage | Tanky enemies and boss waves | Slow attack rate vs. clusters | Mid-path kill zone |
| Fast attack | Swarm waves and fast enemies | Low per-hit damage | Entry corners |
| Area effect | Dense enemy clusters | Less efficient vs. single targets | Bottlenecks and bends |
| Slow/support | Extending kill zone exposure time | No direct damage | Behind damage towers |
Match your tower selection to the wave pattern you’re currently facing, not the one you just cleared. Enemy compositions shift, and a setup tuned only for fast enemies will struggle when a heavy-health boss round hits.
Common Tower Defense mistakes and how to fix them
Recognizing these patterns is the fastest way to improve. Most losing runs trace back to one of four errors.
Spreading gold too thin
Buying six or seven basic towers instead of two or three upgraded ones is the most common mistake in Tower Defense. Six basic towers have dead zones between them, low damage ceilings, and can’t handle the health scaling that begins after wave 5. Two maxed towers in a proper kill zone beat them every time.
When you feel the urge to buy a new tower before your existing ones are upgraded, ask: is this filling a gap or just adding volume? Volume without depth loses. Depth wins.
Ignoring answer accuracy
Players who rush questions to get back to tower management are undermining their own economy. Every missed question is a tower upgrade lost. The question phase isn’t downtime between waves – it’s where your defense budget is built. Bring the same focus to each question that you give to each wave.
Poor placement habits
Three placement habits cost players more wins than anything else. Placing towers at the very start of the path leaves everything downstream undefended if an enemy slips by. Placing towers on long straights without nearby curves lowers the shots-per-enemy rate significantly. Placing towers in isolation where ranges don’t overlap misses the kill-zone effect entirely.
Before placing any tower, check: does its range overlap with at least one existing tower? If not, either reconsider the position or move an existing tower to create the overlap.
Only upgrading between waves
If you have surplus gold during a wave, upgrade immediately. Every second your anchor tower spends at a lower tier while enemies are actively walking through is damage left behind. Waiting for a wave to end before upgrading is instinct, but it’s the wrong instinct – upgrade mid-wave whenever you can afford it
FAQs
Does answering questions faster give more gold in Tower Defense?
Speed contributes to total gold income because more attempts per wave means more correct answers. Accuracy matters more than raw speed – consistently correct answers generate better income than rushing and missing. Getting the answer right, reasonably quickly, is the optimal combination.
What is the best first tower to buy in Blooket Tower Defense?
The specific tower type matters less than its placement. Buy whichever damage tower fits your opening gold budget and place it at the first curve on the path. A basic tower at a corner outperforms a mid-tier tower on a long straight through the first four waves.
Can I win Tower Defense without upgrading towers?
No. Without upgrades, towers hit a damage ceiling and fall behind enemy health scaling around wave 5 or 6. Buying many basic towers instead of upgrading is the most common reason players lose the mid-game. Upgrades are not optional – they’re how your setup stays relevant as difficulty escalates.
How many towers should I have built by wave 10?
A strong setup at wave 10 has two to three fully or nearly upgraded towers in a kill zone, plus one support tower if available. More than five unupgraded towers is almost always weaker than three towers with complete upgrade paths for the same total gold spent.
Does blook choice affect Tower Defense performance?
Some blooks provide passive bonuses in Tower Defense mode. Blook bonuses influence performance at the margins, though, not the fundamentals. Strong placement and gold management will consistently outperform a rare blook paired with poor strategy. Don’t treat blook rarity as a substitute for understanding the mechanics.
Why do enemies keep leaking through my towers?
The most common cause is a coverage gap – a stretch of path where no tower’s range covers enemies walking through. Map out your tower ranges and identify dead zones. A single well-placed tower bridging that gap will usually stop the leaks immediately.
Is Tower Defense a good mode to use in a classroom?
Yes, for a specific reason the mode itself earns: the question-funds-defense mechanic creates direct motivation to answer correctly, because wrong answers hurt gameplay rather than just score — it also features in our best modes for large classes guide. Teachers can assign any question set, making it useful for content review. The mode works best when students are reviewing material they’ve already studied, not encountering it for the first time.
What should I do if I run out of gold mid-wave?
Focus entirely on answering questions correctly until the wave ends. Don’t place cheap towers just to feel like you’re doing something – an unupgraded tower placed mid-wave rarely changes the outcome. Get through the wave, count your losses, then prioritize the highest-value upgrade you can afford at the start of the next round.
Conclusion
Blooket Tower Defense rewards two things above everything else: accurate answering and disciplined gold management. Build a strong economy through the question loop, spend that gold on deep upgrades rather than wide coverage, and place towers at curves where enemies slow. Get those three things right, and most waves become manageable regardless of difficulty.
Start your next game with one corner tower, steady upgrades before expansion, and full attention during the question phase. Note the first wave where enemies break through, then close that gap. That feedback loop, applied game after game, is how you build a strategy that works on any map, with any question set — see our complete Blooket game modes ranked list for more.
Your next big idea is just one read away—browse our handpicked content and ignite your thinking today.